Overview
The installation of the Collivery.net plugin is as easy as a few clicks of the mouse, once installed the plugin will only need you to enter your username and password and confirm the zone settings.
By default, the plugin uses our demo account so that you can test your new plugin before going live. This plugin gives your WooCommerce store the ability to get prices from Collivery.net based on the dimensions and weight of the products added to your client’s cart. After the client paid, the plugin will send the details of the Collivery.net through to us automatically or allow you to do so manually in your backend, also allowing you to modify the particulars of the delivery before sending the delivery request to Collivery.net.
Installation Instructions
Prerequisites
Prerequisites before installing our Collivery.net Extension:
- PHP Version 7.4 To 8.3
- WordPress Version: From 5.1 To 7.0
- WooCommerce Version: From 5.1 To 10.9.1
- Collivery.net Shipping Module for WooCommerce
Make sure before installing this plugin that you make a full SQL database backup and a full backup of all your files. If for some reason something goes wrong, you will need this backup to get your website back to where it was before. Also, please note before updating your WordPress or WooCommerce version make sure you confirm with us that the plugin does support the new version.
* Disclaimer
Collivery.net provides the following plugins as a service to our clients. The responsibility to ensure that the integration is working correctly rests with the client. Collivery.net does not accept responsibility for any errors in pricing, addresses or any other part of the Collivery process which may not work correctly. By downloading the attached plugins the clients accepts the above conditions and will not in any way hold Collivery.net responsible for errors.
Setup
Step 1
Download the plugin from our website here.
Step 3
Click on Upload Plugin. Click Choose File , navigate to where you downloaded the MDS Collivery Shipping plugin and select and open. Then select Install now.
 click image to zoom
Step 2
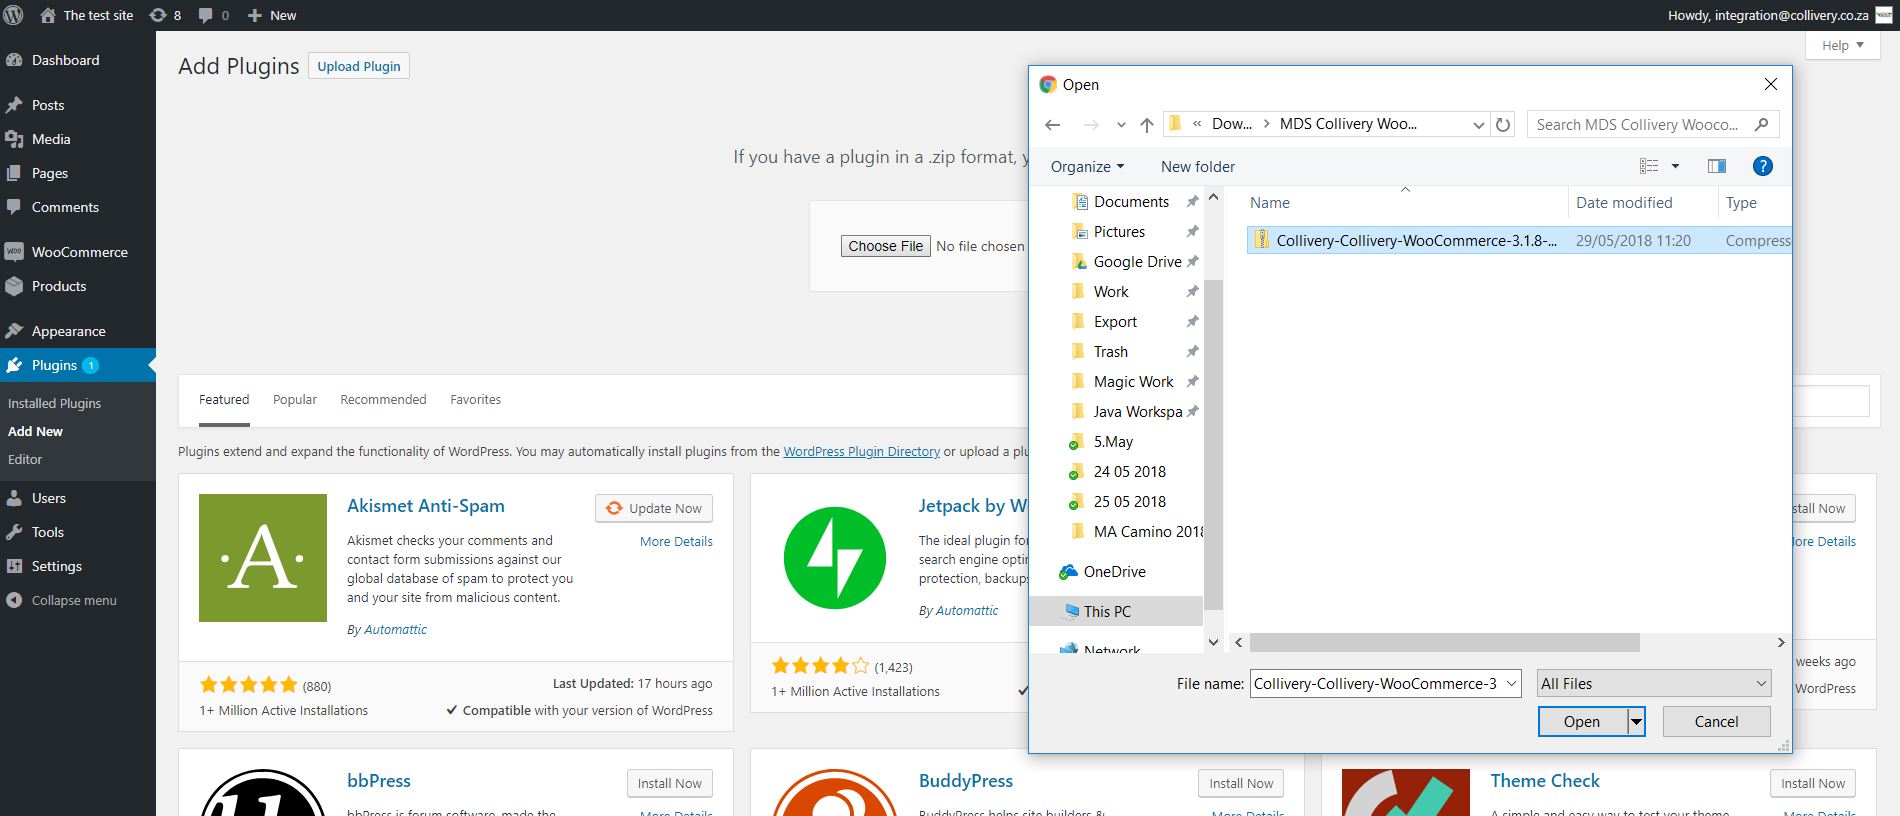
Login to the admin backend of your WordPress site, on the left panel click on Plugins then click on Add New.
Step 3
Click on Upload Plugin. Click Choose File , navigate to where you downloaded the MDS Collivery Shipping plugin and select and open. Then select Install now.
click image to zoom
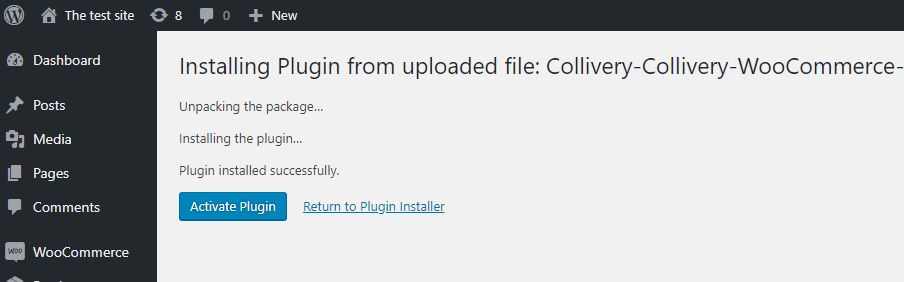
Step 4
Once the plugin is installed it will ask you to activate it. Click on Activate Plugin .
 click image to zoom
Congratulations the plugin is now installed!!
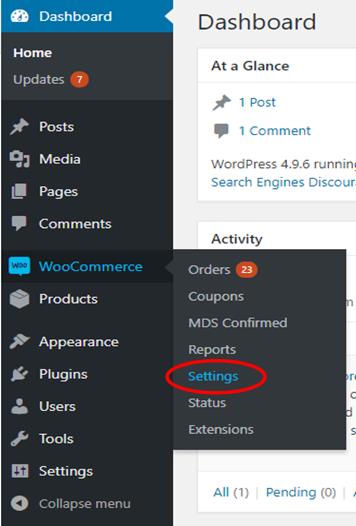
Pre-configuration recommendations
In your backend go to WooCommerce Settings.

In WooCommerce General Settings. Select No location by default in the Default customer location. The MDS Plugin does not work with geolocation.
In the Shipping tab select Shipping Options.
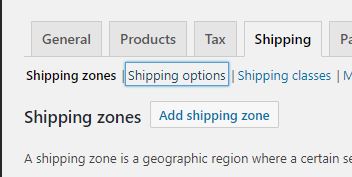

Please make sure the Enable the shipping calculator on the basket page is disabled. You can also select the Hide shipping costs until an address is entered setting which assist any confusion if the shoppers address does not match any zones created.
MDS Collivery Shipping configuration
Step 1
Navigate to the MDS Collivery shipping plugin page.
WooCommerce - > Settings.
Step 2
Click on Shipping, then just below where you clicked on
Shipping click on MDS Collivery shipping.
(Please don’t click on the one in the zones, we’ll get to those
settings just now).

Here is where the main configuration of the plugin is set.
Before you get worried the different services are set in the zones which are further below but do not skip ahead yet.- Is used when you are having issues with the plugin, perhaps there have been price changes or new cities or suburbs loaded onto the system and you would like to retrieve them.
- When you are having issues with the plugin please download error logs and email them to integration@collivery.co.za.
- Enable or disable the plugin.
- Enable or disable Demo Mode.(When enabled, uses demo credentials. Your configured Username/Password are ignored.)
- Your MDS Collivery user name, it is strongly recommended that you create an alias for the user who is in charge of the shop perhaps online@yourdomain.co.za or shop@yourdomain.co.za this will allow you to easily identify which waybills were created by your store and those by a human logging into Collivery.net.
- Your password associated with the username in (4).
- If you would like the description of the products to be added to the special instructions of the waybill so they appear when the waybill is printed.
- If you would like the order number to be added to the special instructions of the waybill so they appear when the waybill is printed as well.
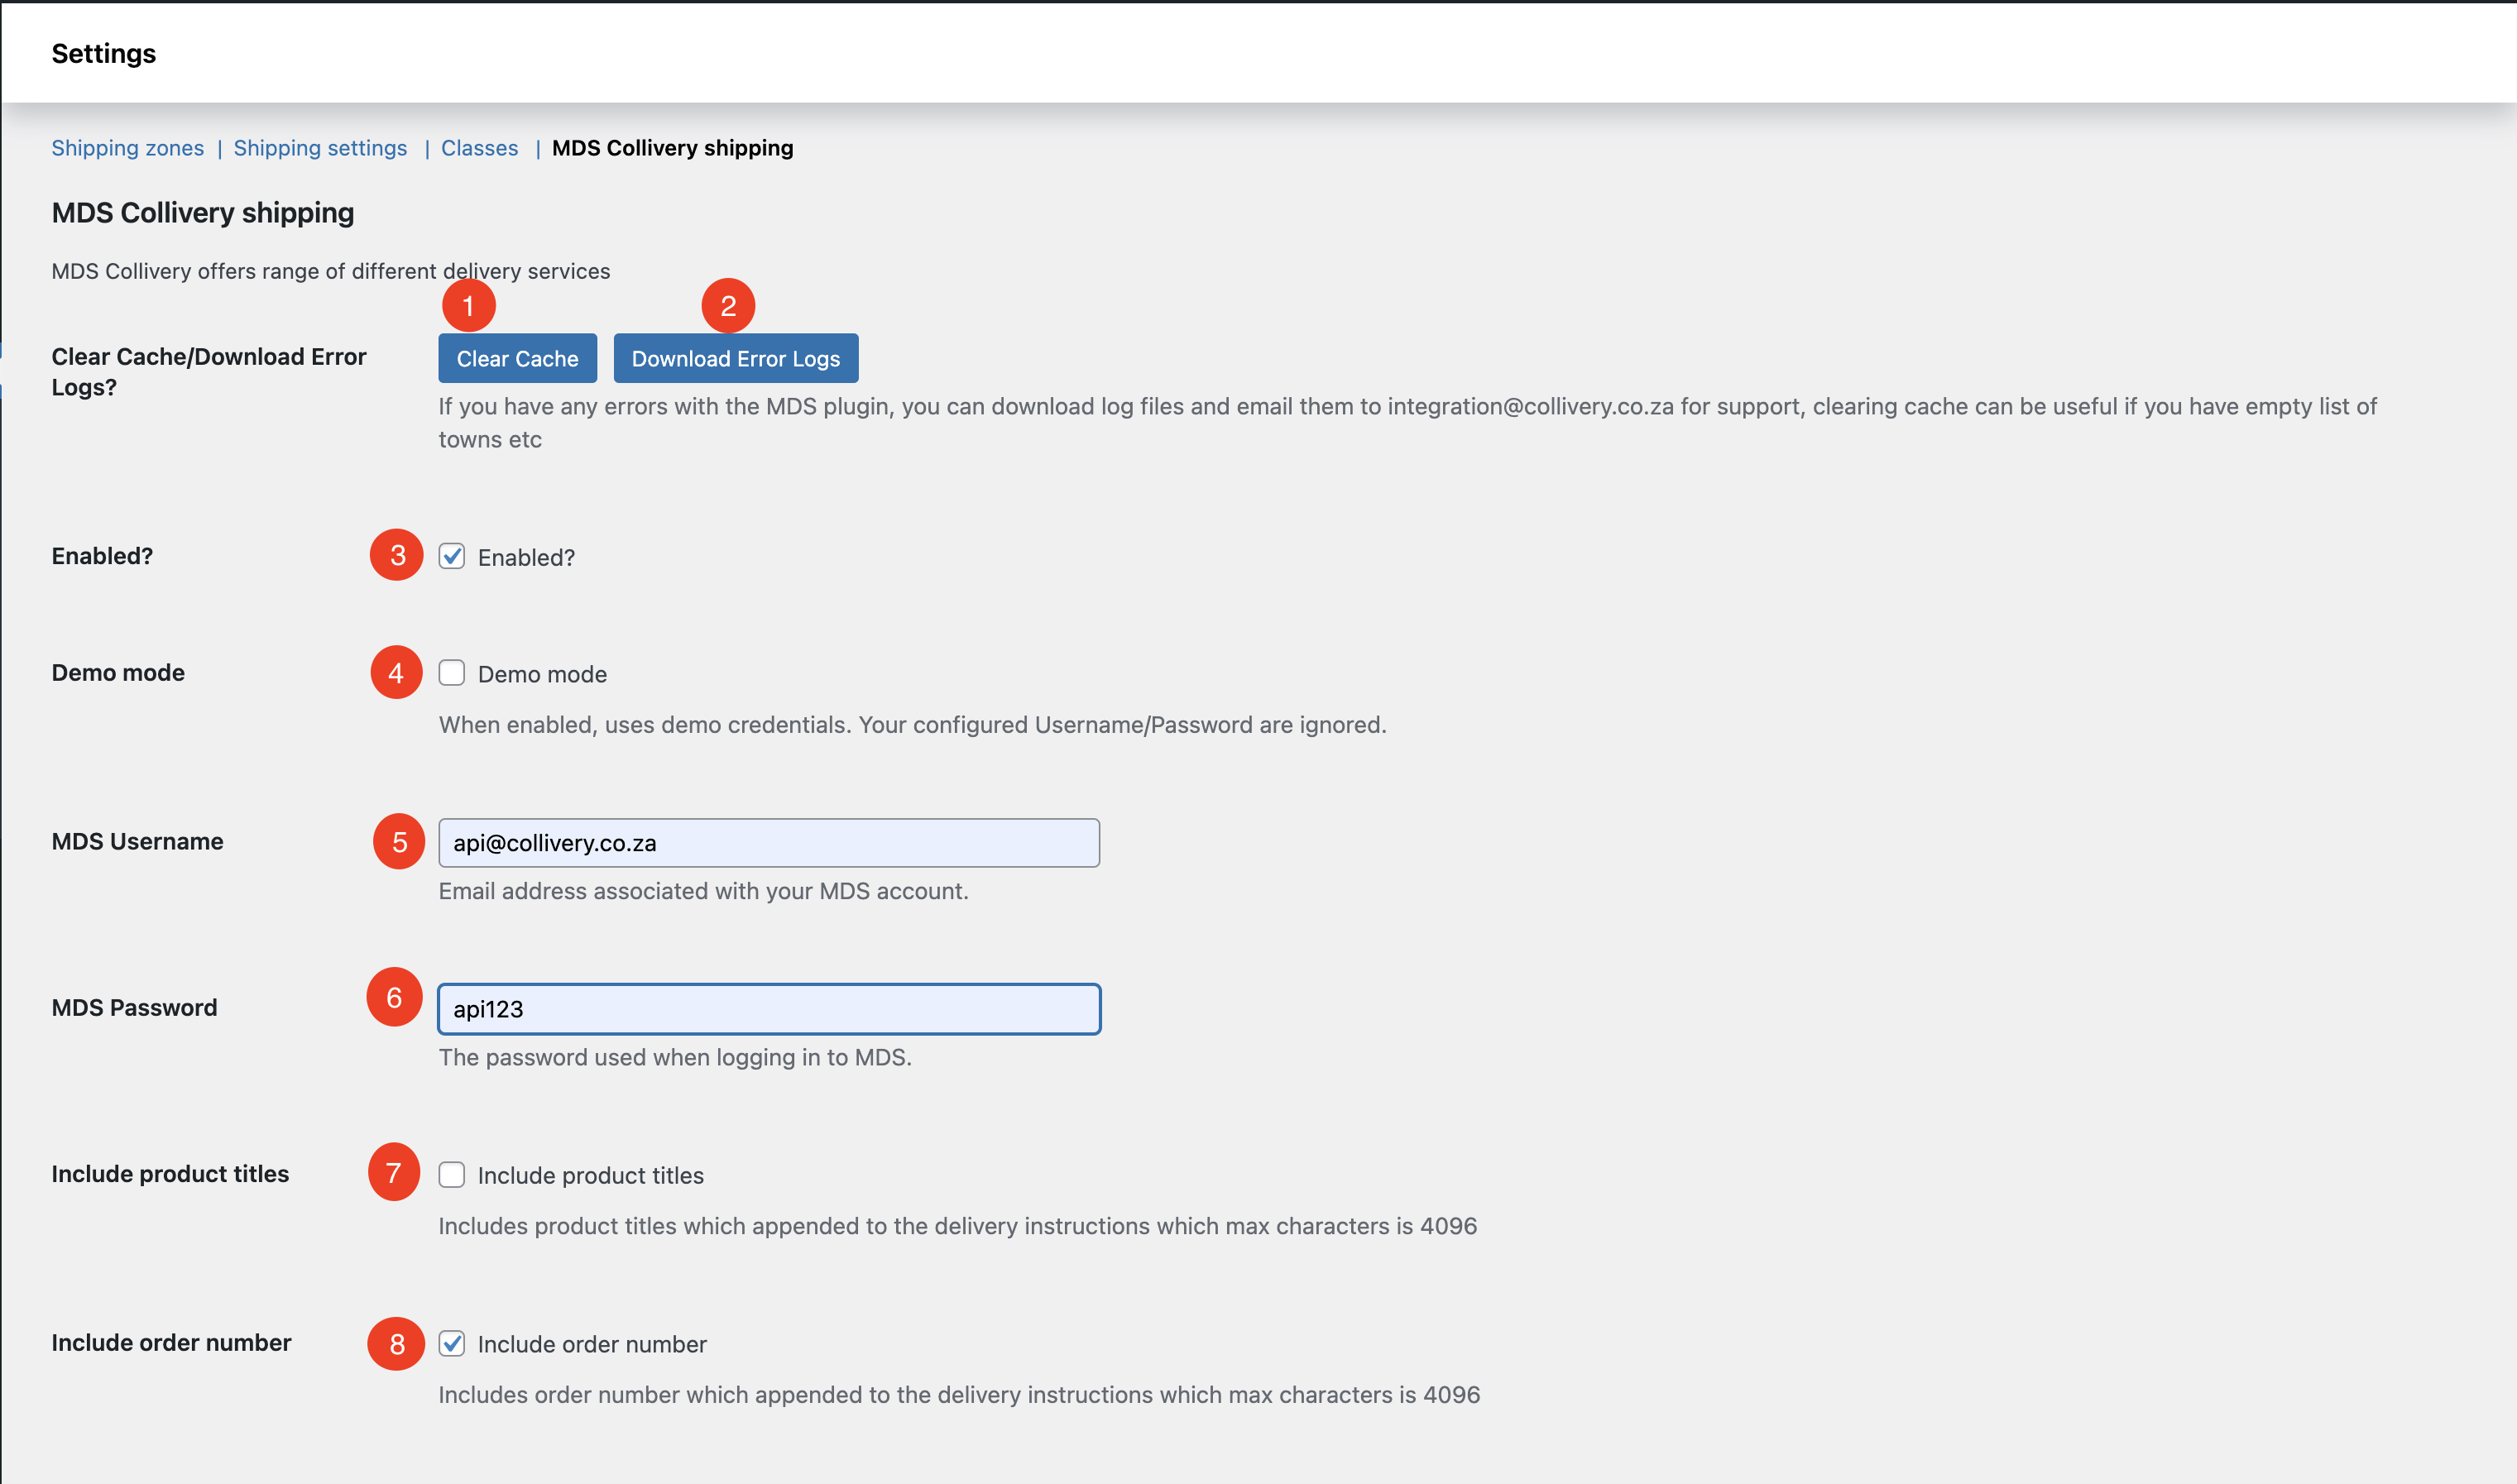
- The suffix of the order number if present
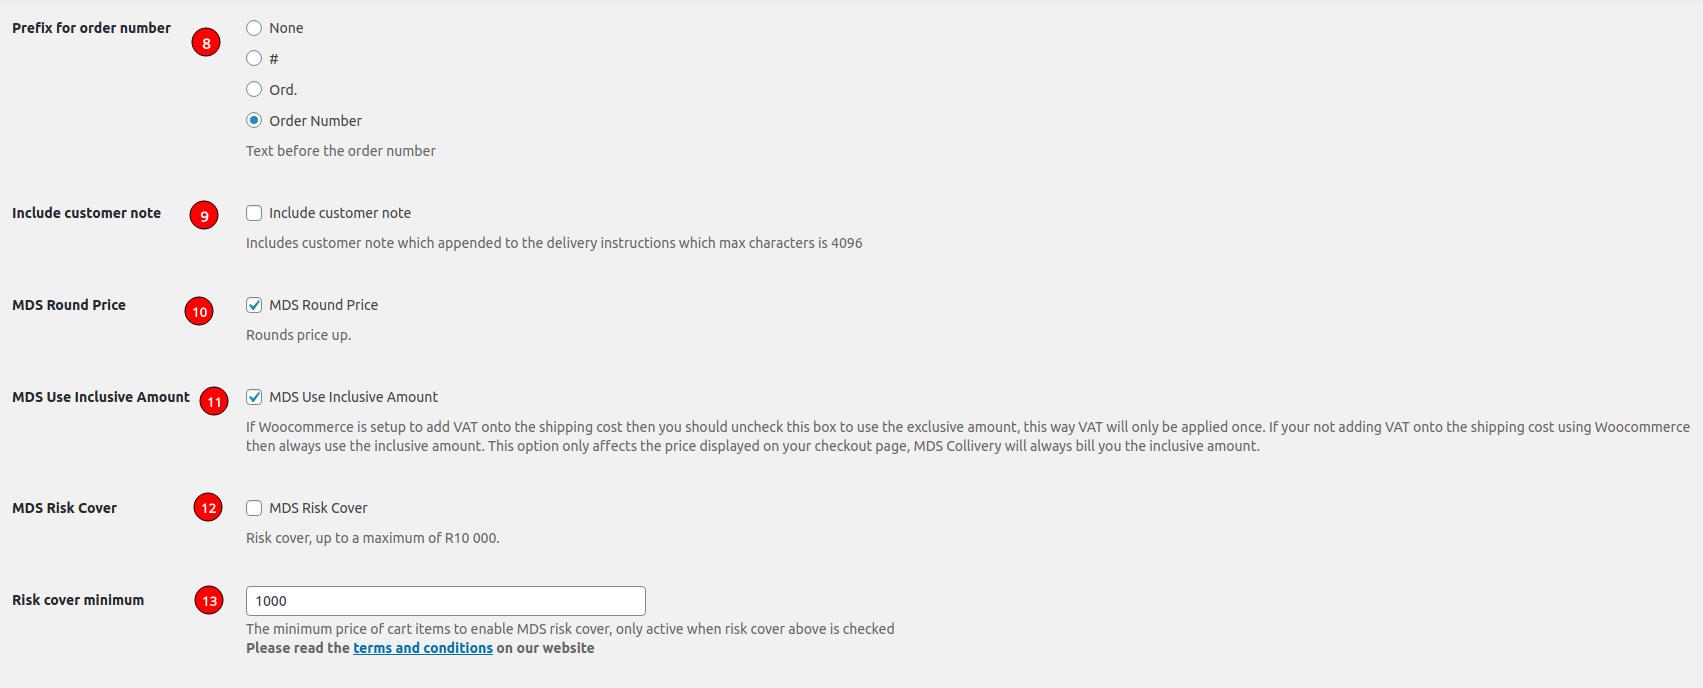
- If you would like the customer's notes to be added to the special instructions of the waybill so they appear when the waybill is printed as well.
- Round Up the shipping cost, so instead of the shipping cost being R123.43 it will be R124
- If Woocommerce is setup to add VAT onto the shipping cost then you should uncheck this box to use the exclusive amount, this way VAT will only be applied once. If you are not adding VAT onto the shipping cost using Woocommerce then always use the inclusive amount. This option only affects the price displayed on your checkout page, MDS Collivery will always bill you the inclusive amount.
- Include MDS Risk Cover with each order
- By default MDS covers the up to R1000 on each waybill that does not have risk cover enabled. Please also bear in mind that MDS will on completion of a successful claim pay back the cost of an item, so perhaps your cart amount needs to be R1250 if your mark-up on your goods is 25%
- Exclude non-deliverable items from shipping calculation such as Virtual
- Exclude non-deliverable items from shipping calculation such as Downloadable
- Free delivery mode (explained below)
- If you would like the waybill to be automatically generated when a order goes into the Processing status
- Select the statuses that will trigger Automatic MDS Processing (Hold CTLR to select multiple)
- If you would like waybills added to be accepted, so if you have (17) enabled and/or (18) disabled you can technically never need to log into your Wordpress site to action waybills, they will always bee added to our system and you can log into Collivery.net to accept once you are ready for the collection to take place
- Allow searching for suburb on checkout - by default this is enabled
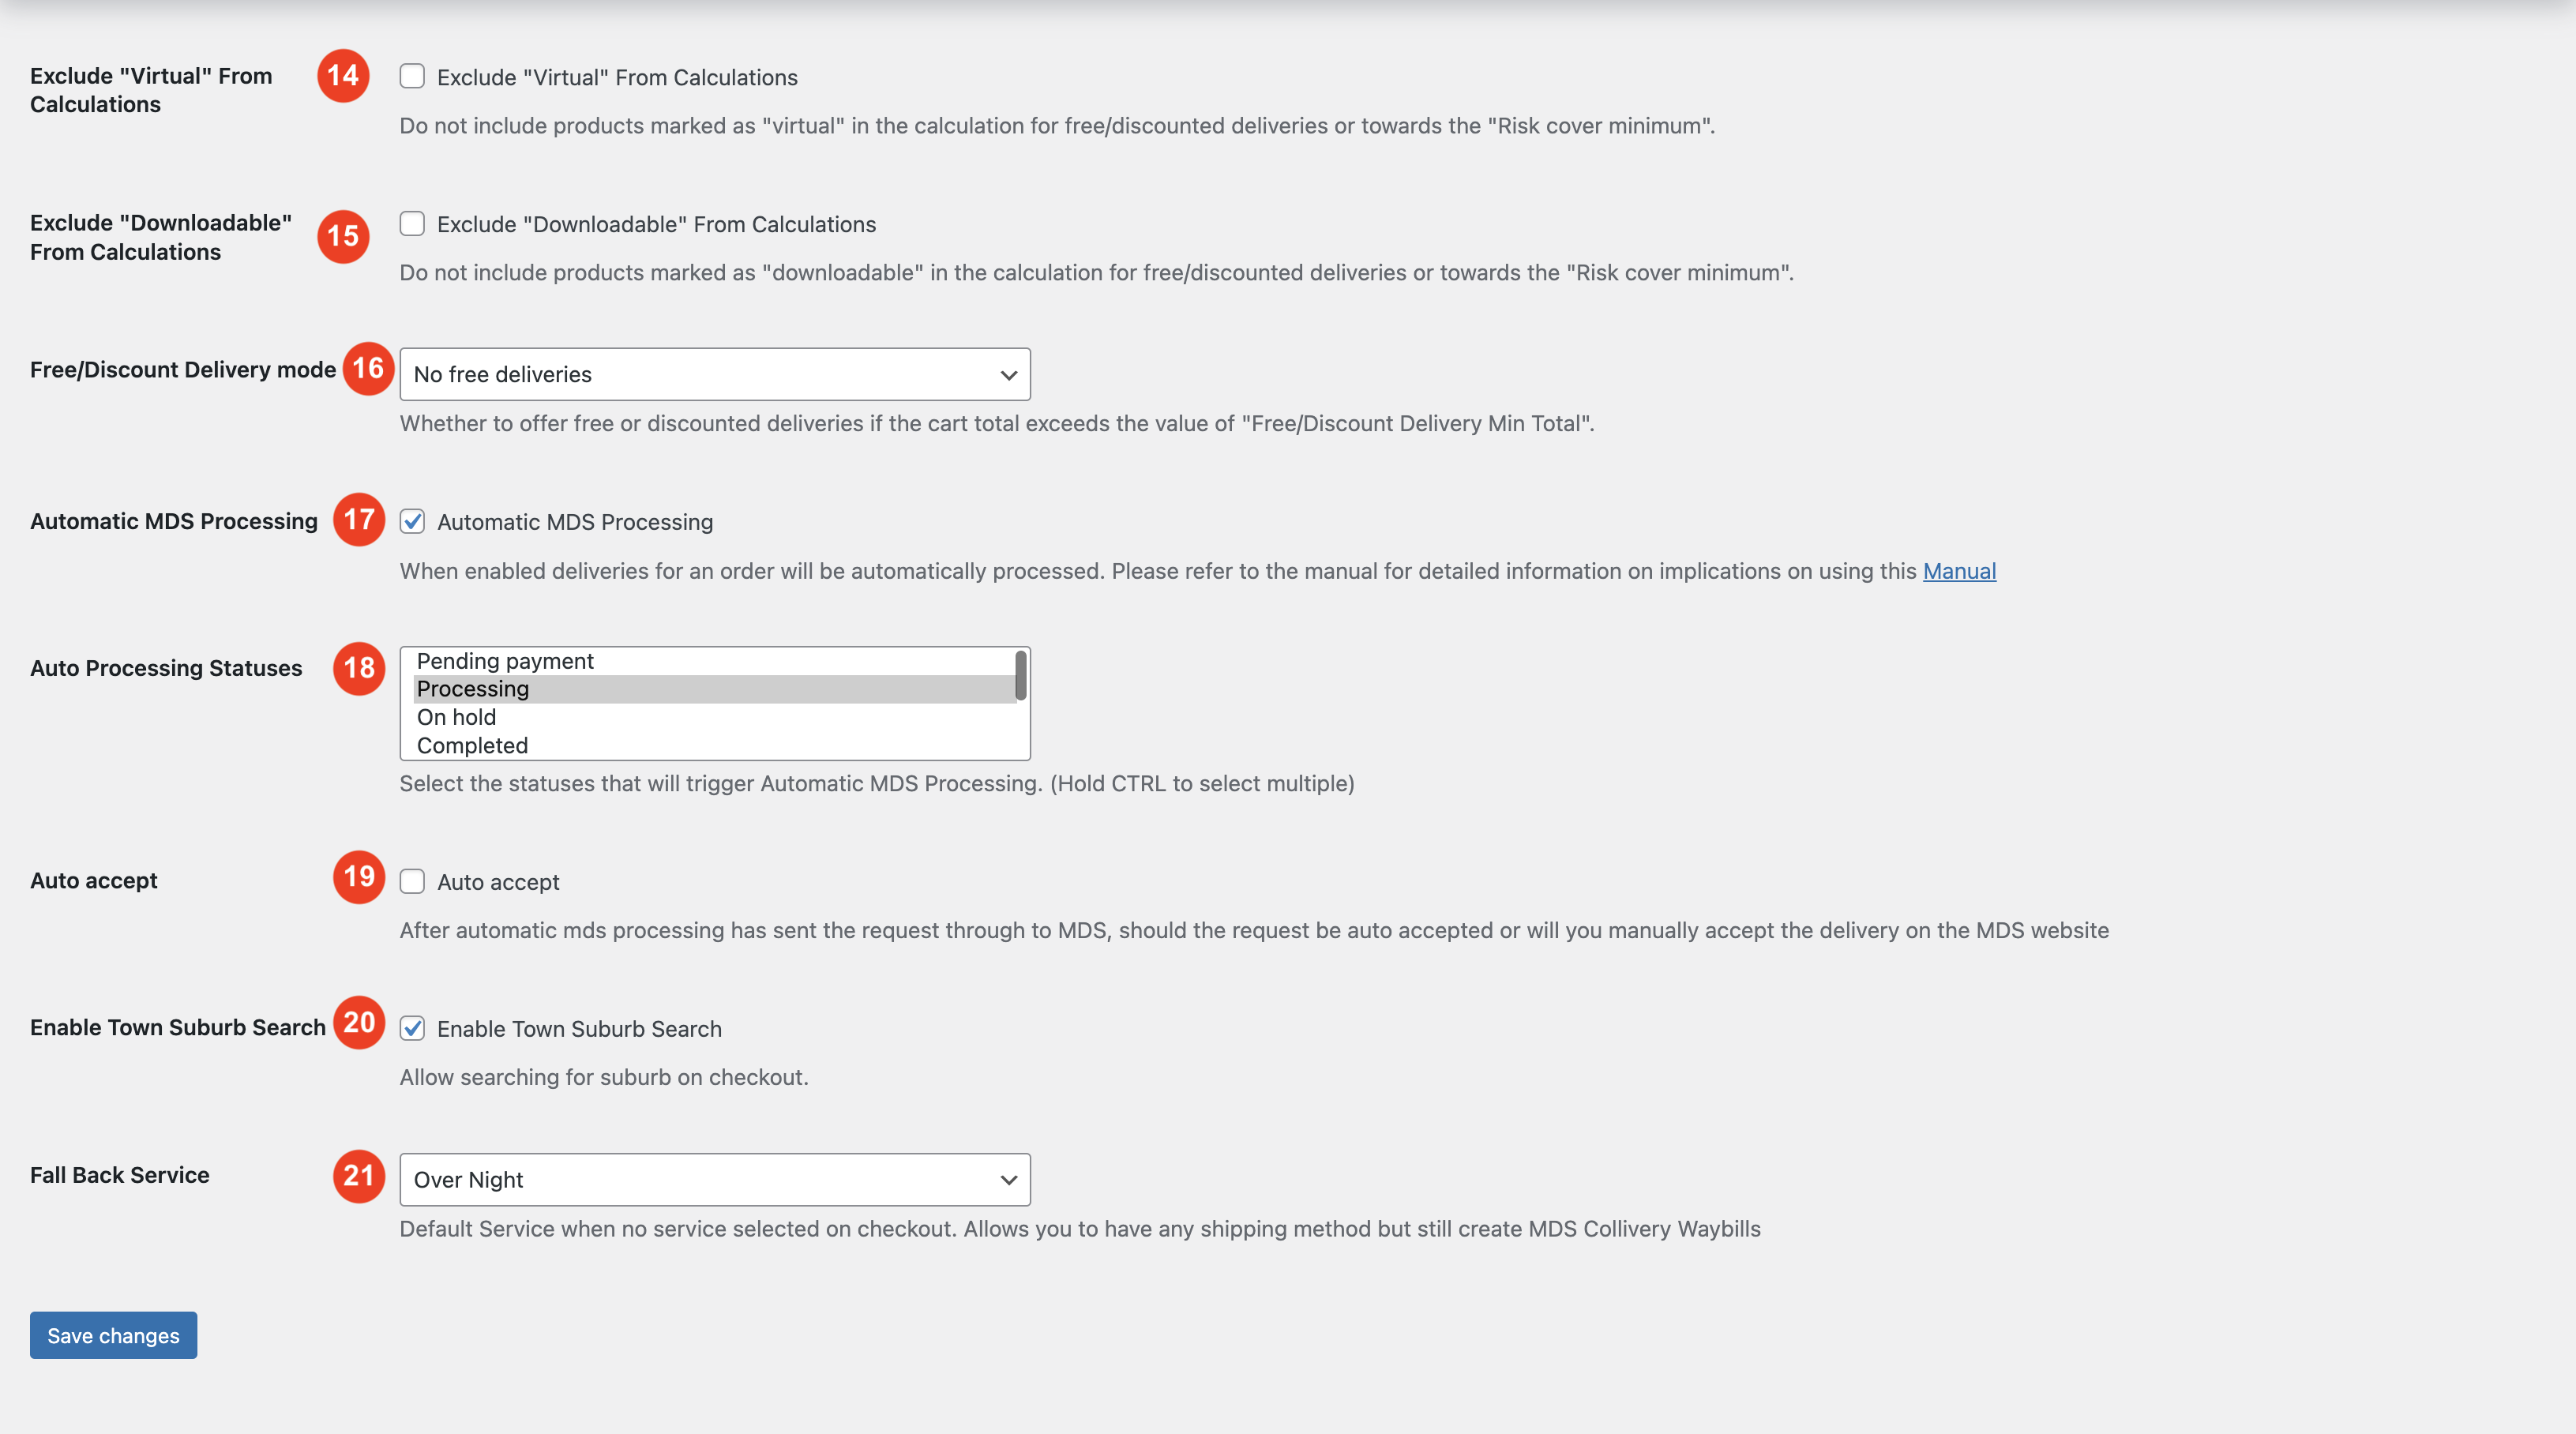
Free Shipping configuration
There are three options available for you to add more functionality to your shipping settings, free delivery mode.No free deliveries

Discounted delivery fee
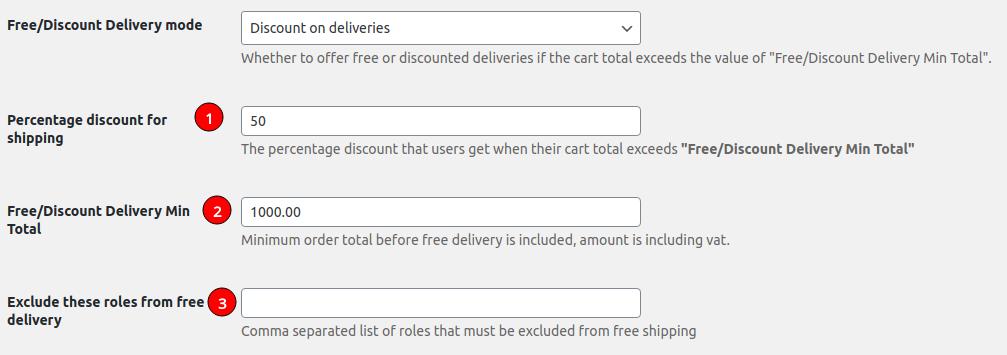
- The percentage discount to apply to the shipping
- The minimum amount of the cart before discount is applied
- Any roles where discounted shipping will not apply
Free deliveries
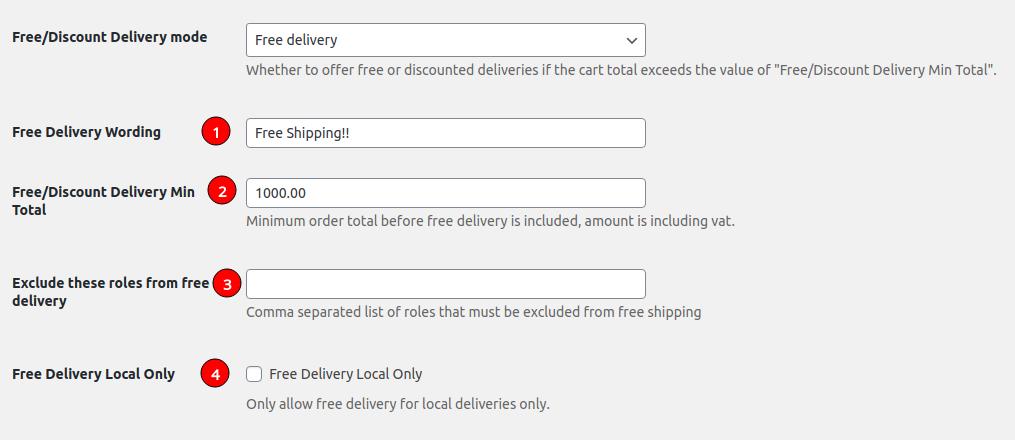
- The Wording on checkout that will display
- The minimum cart amount needed for free shipping to apply
- Any roles where free shipping will not apply
- Enable if you would only like free shipping to apply to local deliveries
Setting up Zones
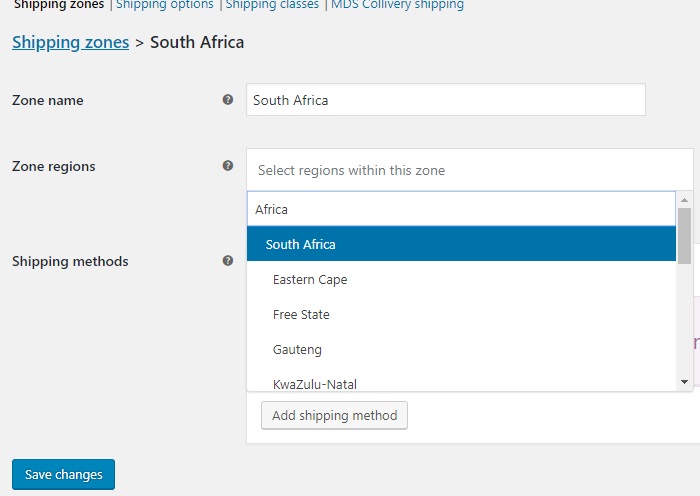
Step 1
Navigate to Shipping Zones
WooCommerce -> Settings -> Shipping

Step 3
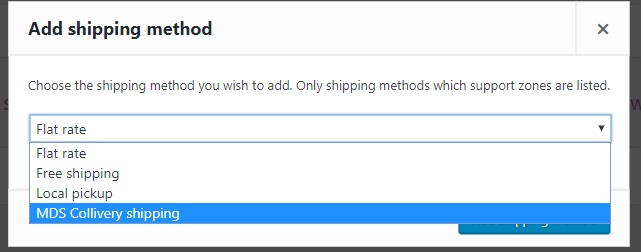
Once region is selected click on Add shipping method
and select MDS Collivery Shipping -> Add shipping method
Give the zone a name, then select a region for the zone
Step 2
Click on Add Shipping Zone
Give the zone a name, then select a region for the zone
Now that the MDS Collivery shipping method has been added to the
zone you can now edit it.
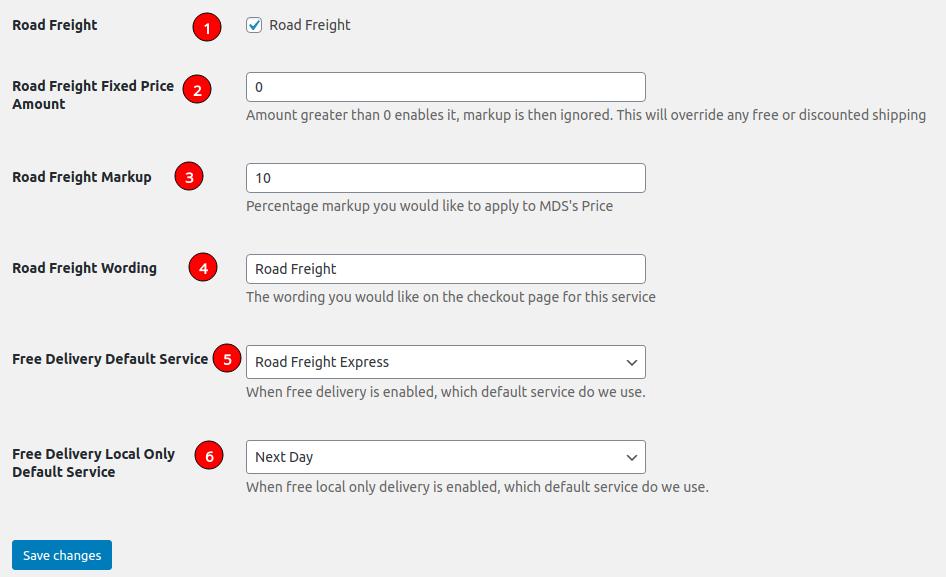
In the settings of the zone instance of MDS Collivery shipping you can:
- Enable or disable services
- The fixed amount for this service should you wish not to display the actual shipping costs
- Change the percentage mark-up on the shipping costs (this has been put in place to add safe guard if the dimensions sent to MDS Collivery are not the same as the physical shipment, once your shopper has checked you may find it difficult to recoup price changes and it also adds an extra income).
- Change the wording that will appear on the checkout page next to the shipping cost.
- Select the service that will be used on Free shipping when it is free local only.
Usage Examples
Shop Integration (Client)
Once your shopper has filled in the address details the shipping prices will display below, depending in which zone the shopper falls in they will be priced accordingly.
Shop Integration (Admin interface)
Once your shopper has placed the order the order will be available to process in your backend. With automated waybill processing, waybills are processed when an order goes into “Processing” this usually occurs when the payment has been received. If you have automated processing enabled and your order goes into processing it will generate and MDS Collivery waybill. If you also have Auto accept enabled the waybill will also be accepted and we will then dispatch a driver to collect. If you do not have auto accept enabled, you will need to log into your Collivery.net overview to accept the waybill.
If an order is On hold and you have automated processing enabled and you are ready for collection you can change the status to processing and it will generate a waybill and if auto accepted they waybill will be accepted.
If you have not enabled automated processing:
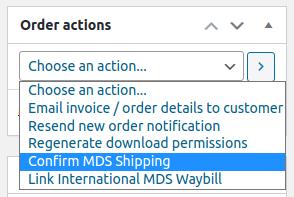
Step 1
Open the order, in the order actions select the action Confirm MDS Shipping and click update or >
Step 4
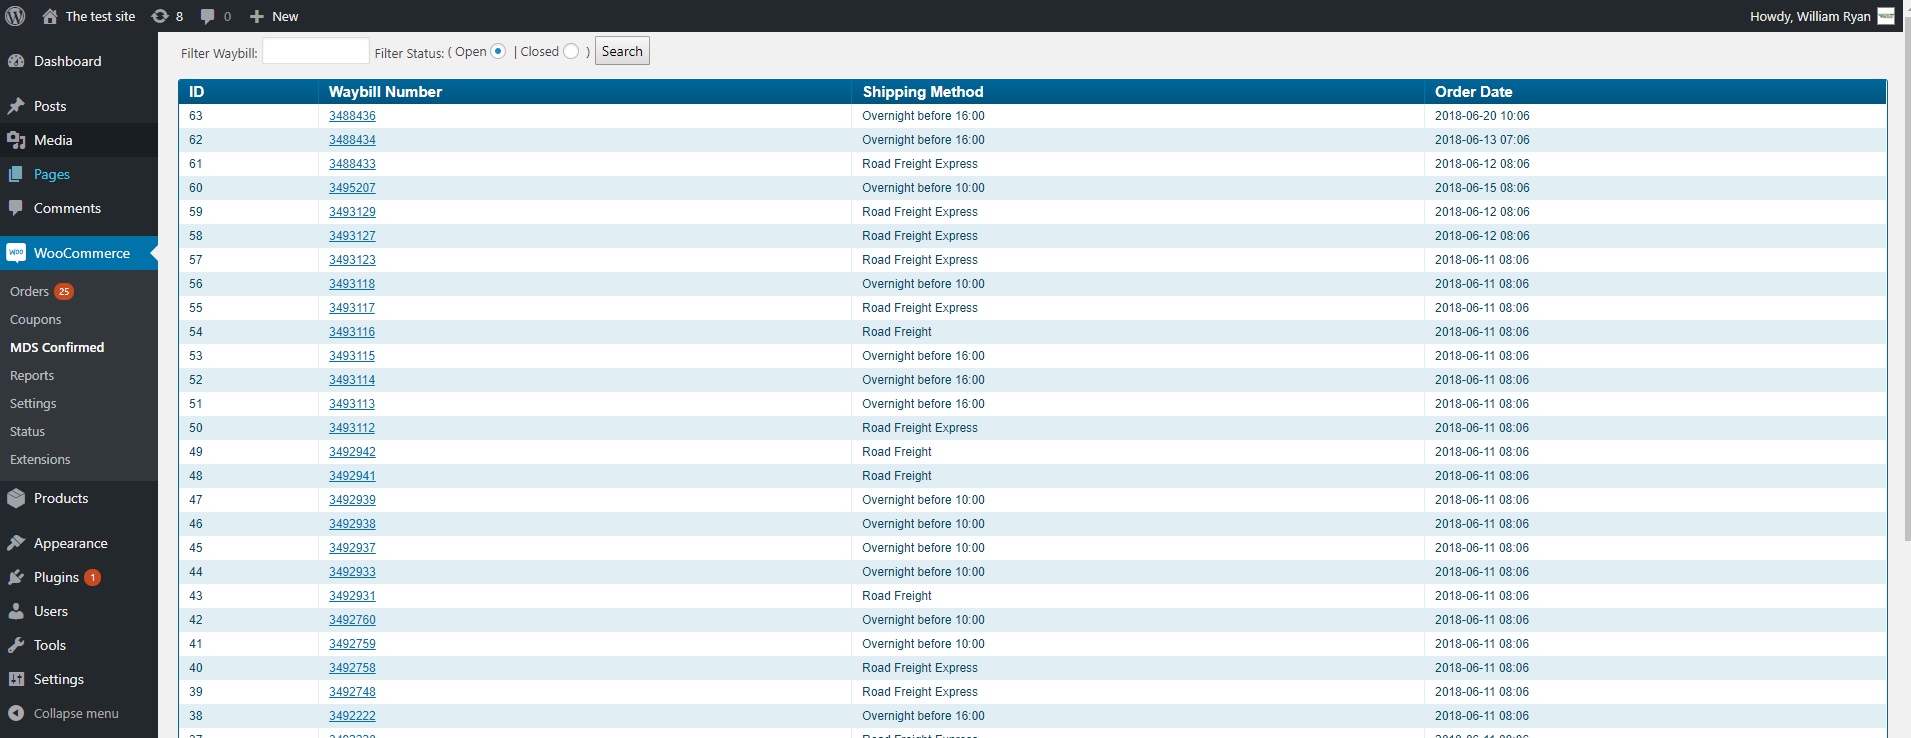
To view your history of waybills go to WooCommerce > MDS Confirmed.
 click image to zoom
Step 2
You will then be taken to a page where you can review the details of the waybill
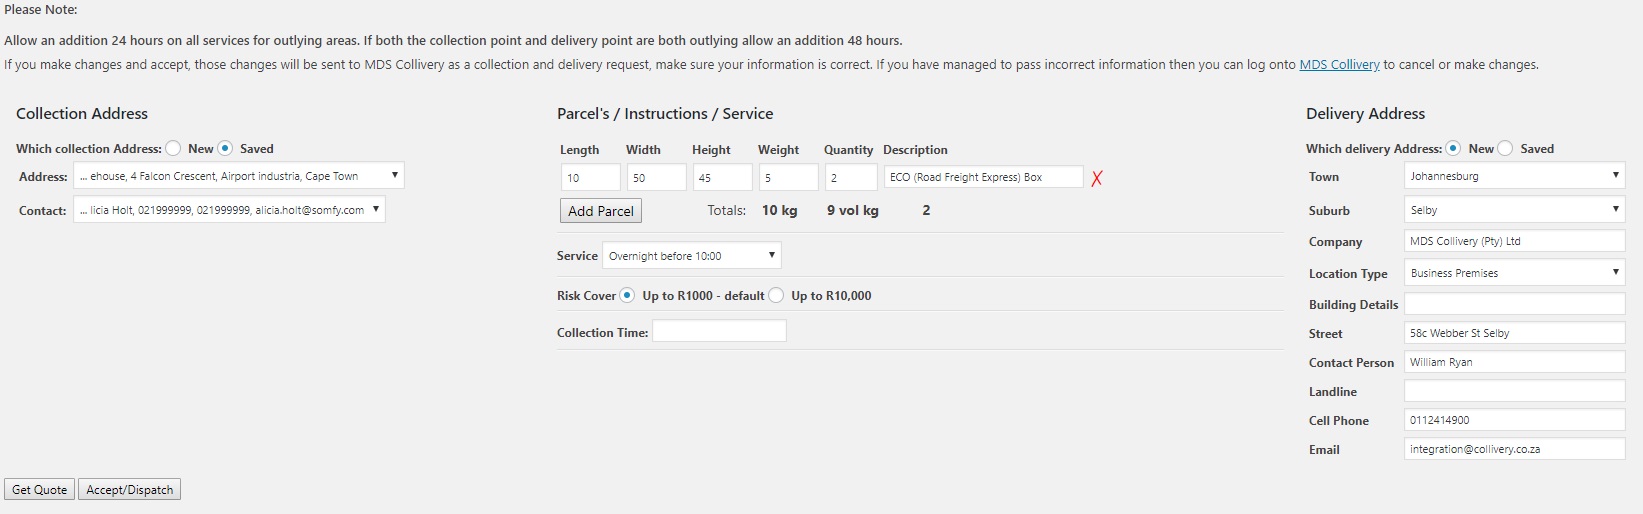
Step 3
Click Get Quote to see the pricing and/or Accept/Dispatch to generate a waybill.

Step 4
Click on Upload Plugin. Click Choose File , navigate to where you downloaded the MDS Collivery Shipping plugin and select and open. Then select Install now.
click image to zoom
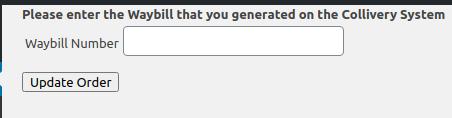
Step 5
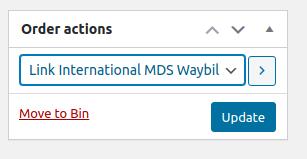
To Link an already generated waybill to the order, usually from international orders. Type in the waybill number to link
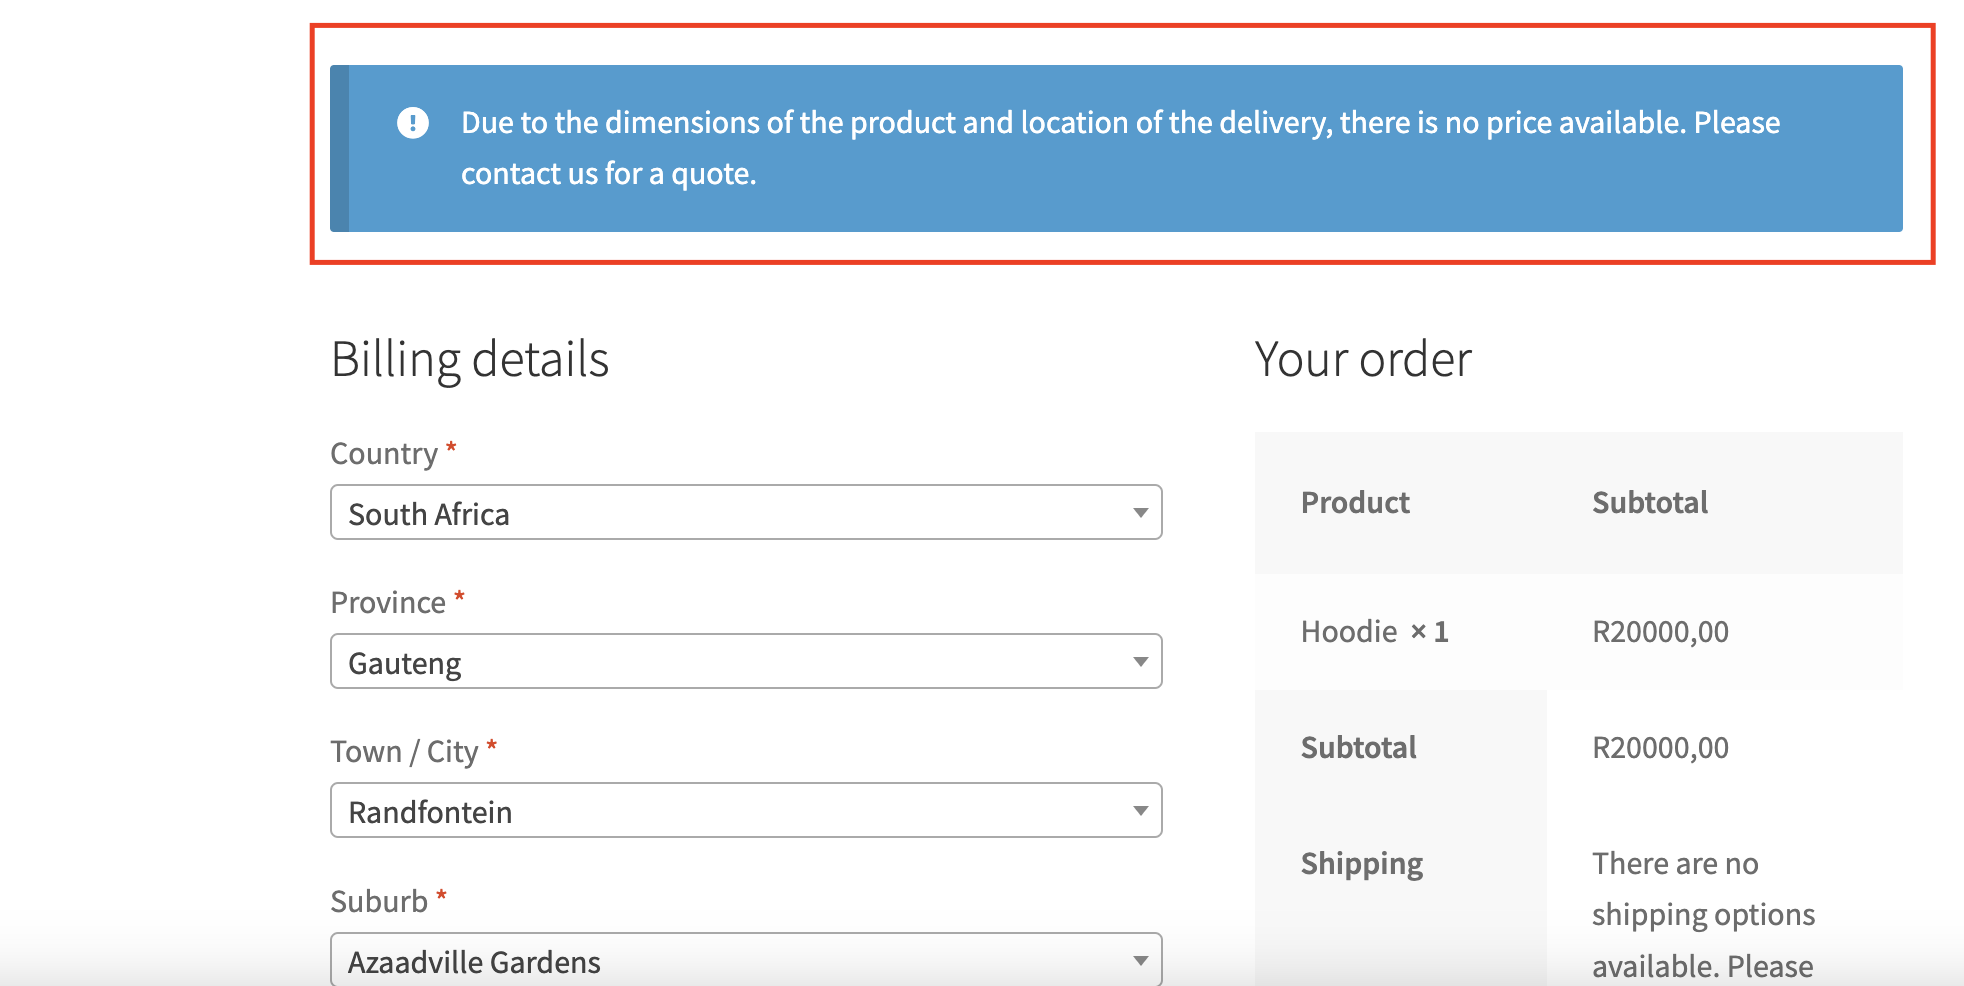
Error Handling for Product Dimensions and Delivery Location
If the dimensions of the product or the delivery location prevent a shipping price from being calculated, the system will display a notice informing the customer that no price is available and that they should contact support for a shipping quote.
If you encounter any issue please do not hesitate to email us integration@collivery.co.za. If possible please attach your error logs from the Download Error Logs button in the MDS Collivery Shipping main config.