Overview
The installation of the Collivery.net plugin is as easy as a few clicks of the mouse, once installed the plugin will
only need you to enter your username and password. By default the plugin uses our demo account so that you can test
your new plugin before going live.
This plugin gives your OpenCart store the ability to get prices from Collivery.net based on the dimensions and weight
of the products added to your client’s cart. After the client paid, the plugin will send the details of the Collivery
through to us, or allow you to do so manually in your backend, also allowing you to modify the particulars of the
delivery before sending the delivery request to Collivery.net
Once the delivery is accepted, the delivery's details are saved in your database where you can access the delivery in
order to track its status and view proof of delivery.
Installation Instructions
Prerequisites
Prerequisites before installing our Collivery.net Extension:
- OpenCart Version: 2.0.3.1, OpenCart Version: 2.1.0.1 or OpenCart Version: 2.3.0.2
- PHP Version 7.4
- PHP SoapClient enabled
- Collivery.net Shipping module for OpenCart v2.3.0.2
- Collivery.net Shipping module for OpenCart v2.0
- Collivery.net Shipping module for OpenCart v2.1
* Disclaimer
Make sure before installing this plugin that you make a full SQL database backup and a full backup of all your files. If for some reason something goes wrong you will need this backup to get your website back to where it was before. Also please note before updating your OpenCart version make sure you confirm with us that the plugin does support the new version.
- Collivery.net provides the following plugins as a service to our clients.
- The responsibility to ensure that the integration is working correctly rests with the client.
- Collivery.net does not accept responsibility for any errors in pricing, addresses or any other part of the collivery process which may not work correctly.
- By downloading the attached plugins the clients accepts the above conditions and will not in any way hold Collivery.net responsible for errors.
- Collivery.net’s integration team will provide all assistance to the client in the integration process and, where possible, will provide technical support to the client.
- This plugin only supports your primary address as listed with Collivery.net as a collection point during the checkout to display a quote for shoppers. Changing of collection addresses can only be done in the admin area.
- This plugin does no unit conversion and works with the units cm - centimetre, kg - kilogram and the currency R - ZAR rand. Whatever specs we receive or send out will be in cm, kg or R regardless of the symbol unit that is printed out.
- This plugin only allows for you to dispatch deliveries. To cancel deliveries you will have to log in to collivery.net
- This plugin requires javascript enabled in browsers to work.
- This plugin requires specific non standard address fields to work. Current addresses will have to edited once so that they contain the correct fields of data.
- Please ensure the Collivery.net - OpenCart Plugin you download and install is the correct plugin for your version of OpenCart. This is most important as OpenCart version updates are major updates and not backwards compatible.
Setup
First, you download the zip archive containing the module files.
You unzip it to your pc, through an ftp client - connect to the server and upload the contents of the
admin, catalog, system folders inside
upload/ to their respective folders in the OpenCart installation. Be sure to not overwrite any of the folders already there, rather copy the
.php files into the folders already there.
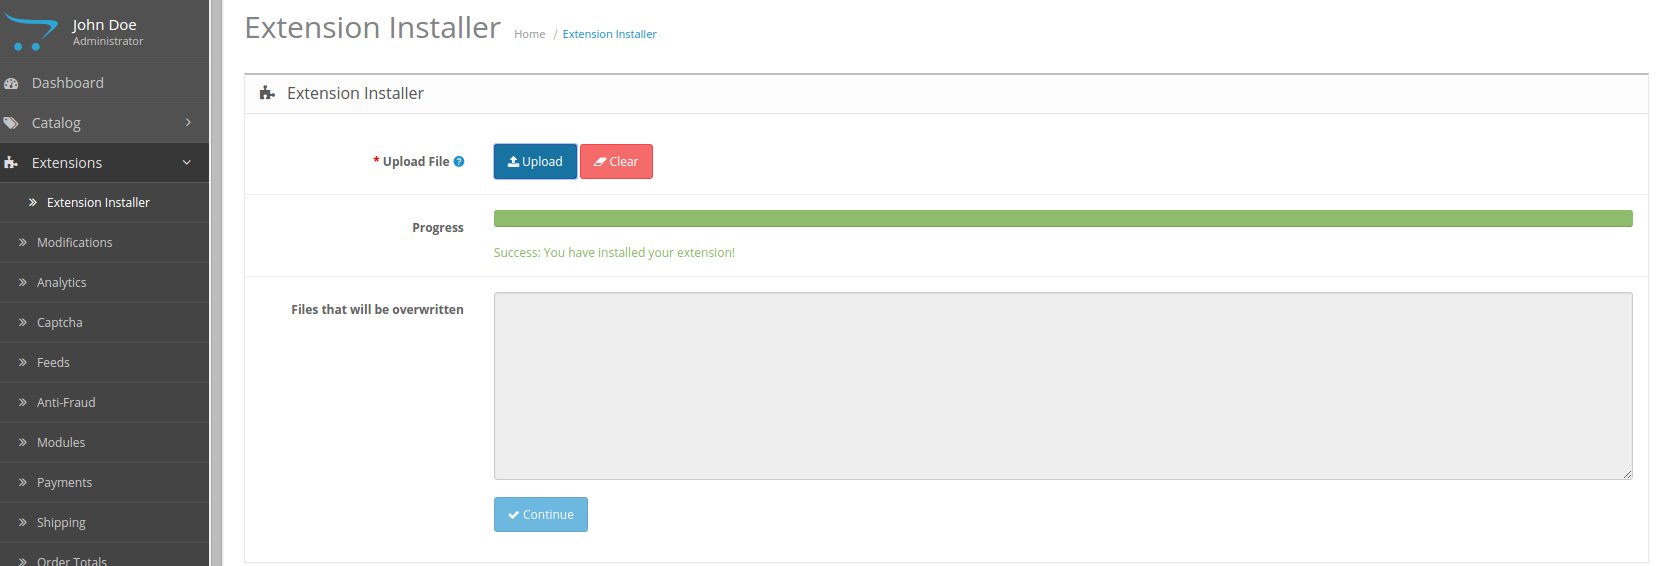
Now, go to your browser and navigate to your OpenCart site administration backend. In the "Extensions" menu select "Extension Installer" and upload "mds.ocmod.xml".
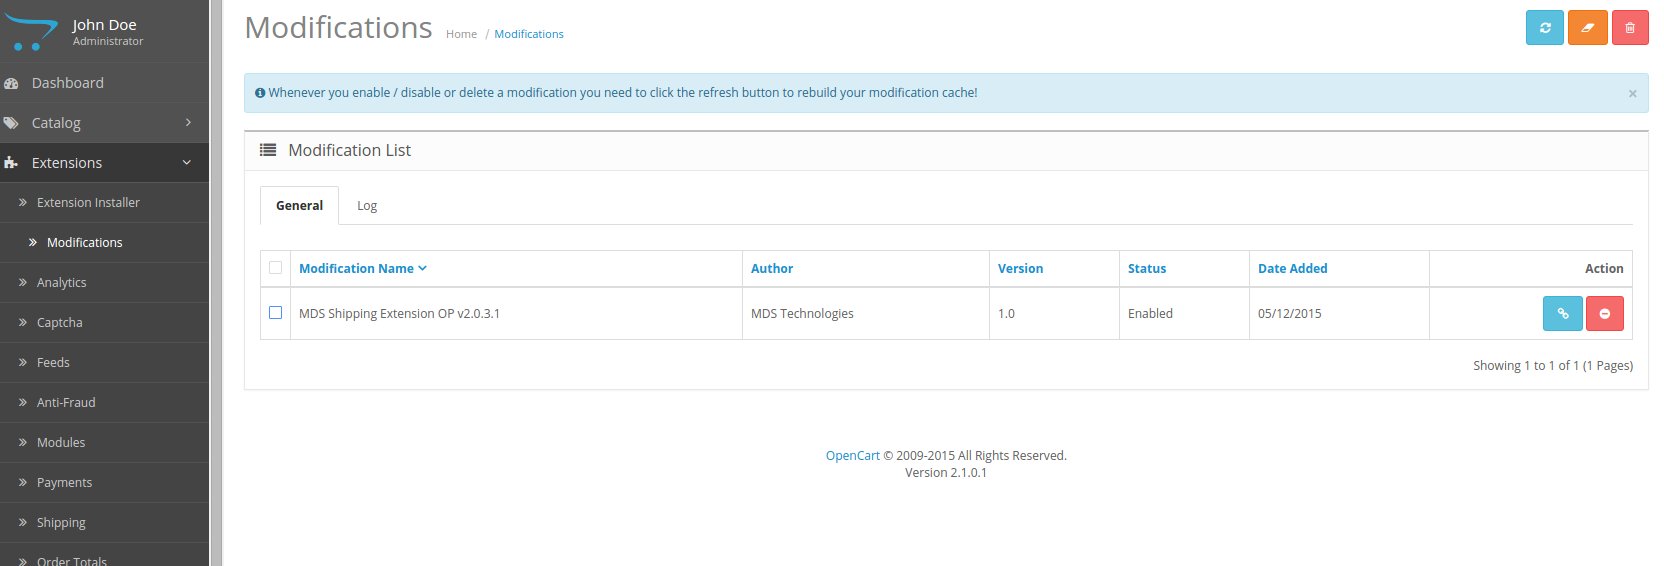
Next navigate to "Extensions" menu select "Modifications" and refresh cache.
Please note that this will reload ALL the ocmod files that are listed.
Now, go to your browser and navigate to your OpenCart site administration backend.
In the extension menu select "Shipping", and click install by the Collivery.net shipping extension.

Click on "Edit" and enable the extension.
To uninstall navigate to "Shipping" in your admin back office, search for the Collivery.net shipping extensions and then click on "uninstall". Next navigate to "Extensions" menu select "Modifications", delete the modification file for Collivery.net and refresh the cache. Please note that this will reload ALL the ocmod files that are listed.
Configuration
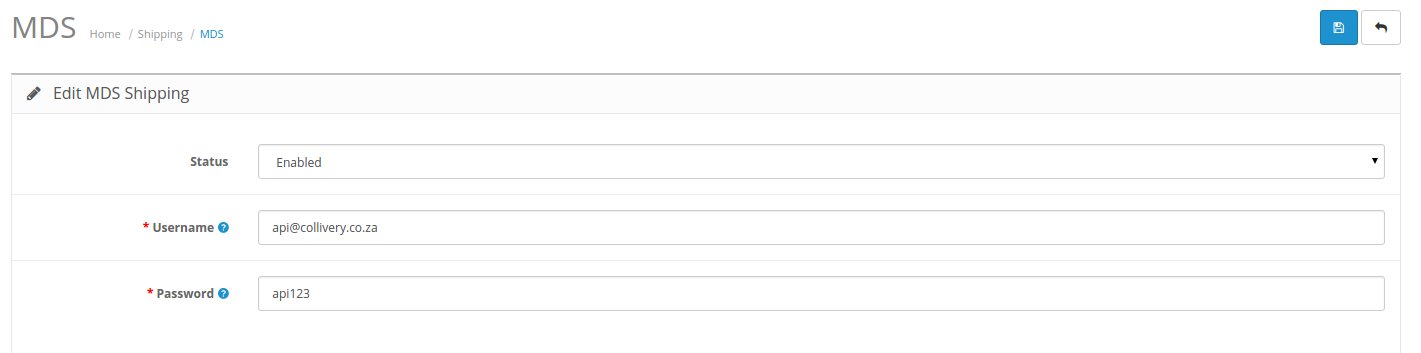
To configure navigate to "Shipping" in your admin back office,
search for the Collivery.net shipping extension and then click on "Edit".
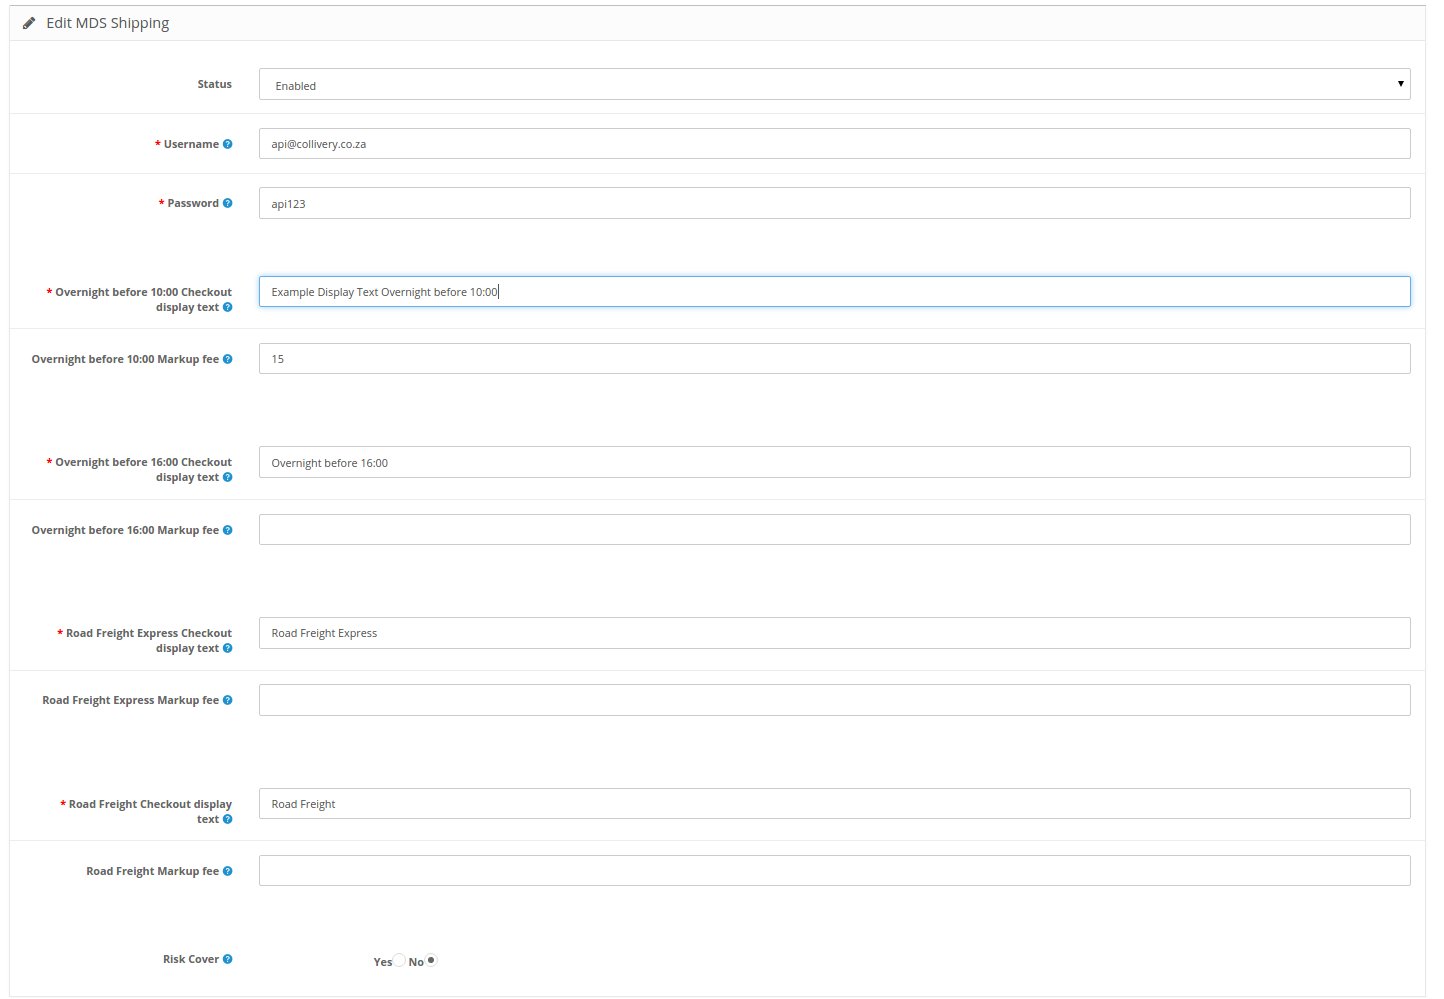
Here you will enter in your Collivery.net login details, as well as add a markup/handling fee for each service.
You can also change the display title that will be used for displaying a quote during the checkout
process and indicate if you would like risk cover enabled on your colliveries.
Usage Examples
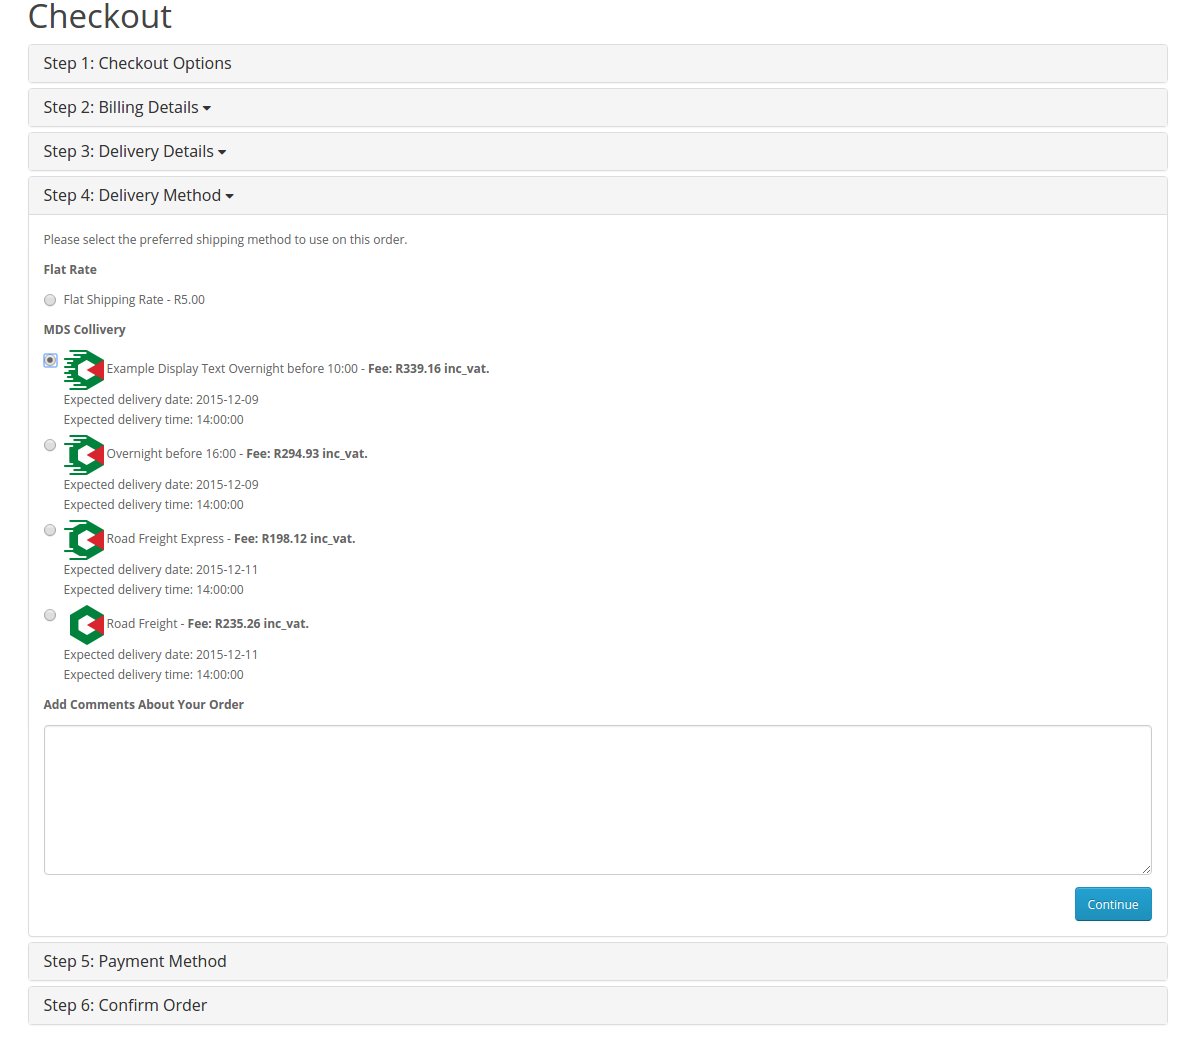
Shop Integration (Client)
The shopper will check out as per usual. When selecting the delivery method the different services we
offer will be displayed with your markup/handling fee already calculated if you specified one as well
the display title that was configured in the admin section.
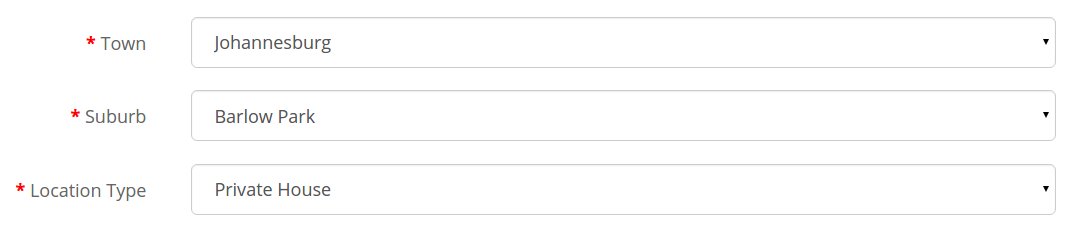
When saving or adding addresses the following fields must be completed otherwise the shipping fee
returned may inaccurate or no shipping fee at all will be returned.
Admin Interfaces
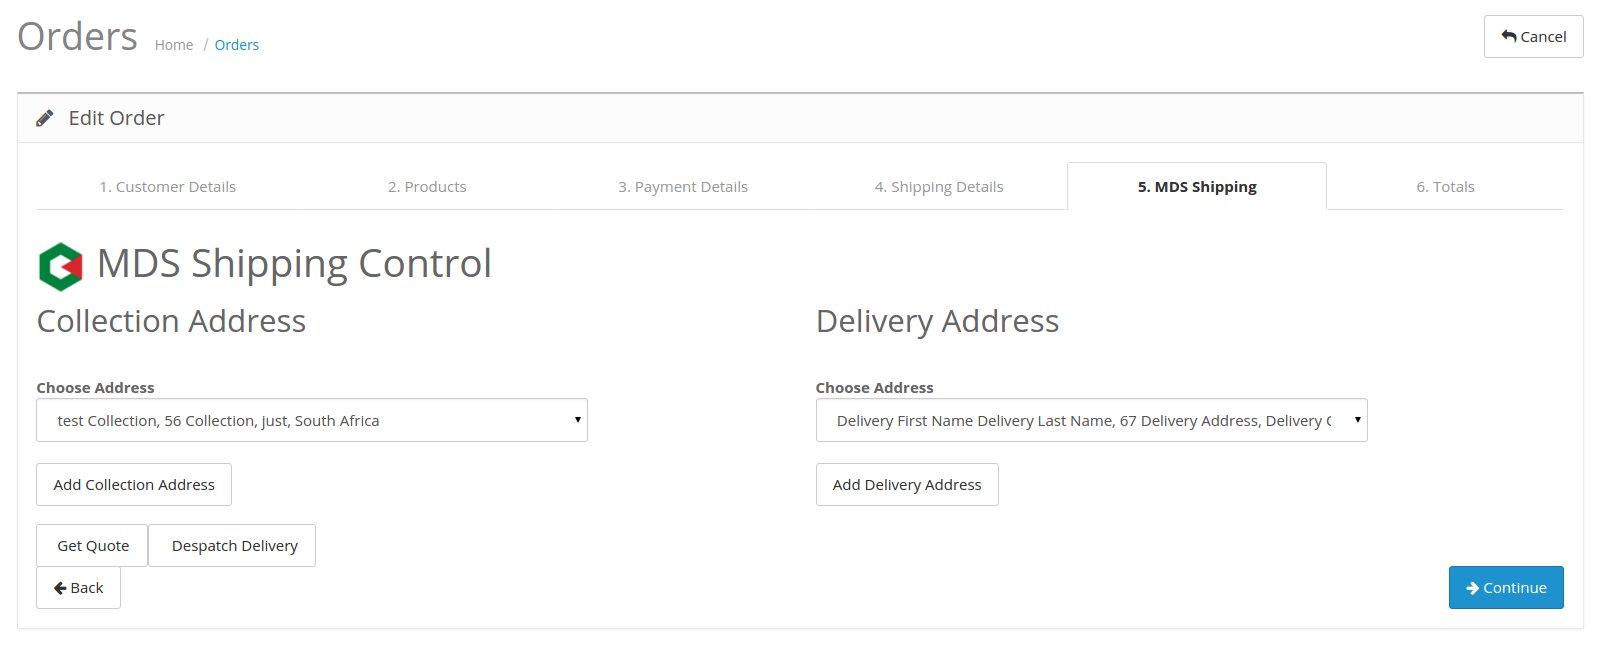
To despatch a delivery once ready in your admin back office navigate to "Sale" -> "Orders"
and then edit the required order. You will see the MDS shipping tab.
Here you will be able to:
- Change collection address
- Change Delivery Address
- Get a quote
- Desptach the delivery
- Add collection and delivery addresses
Please make sure the right addresses are being displayed under the Collection and Delivery Addresses sections.
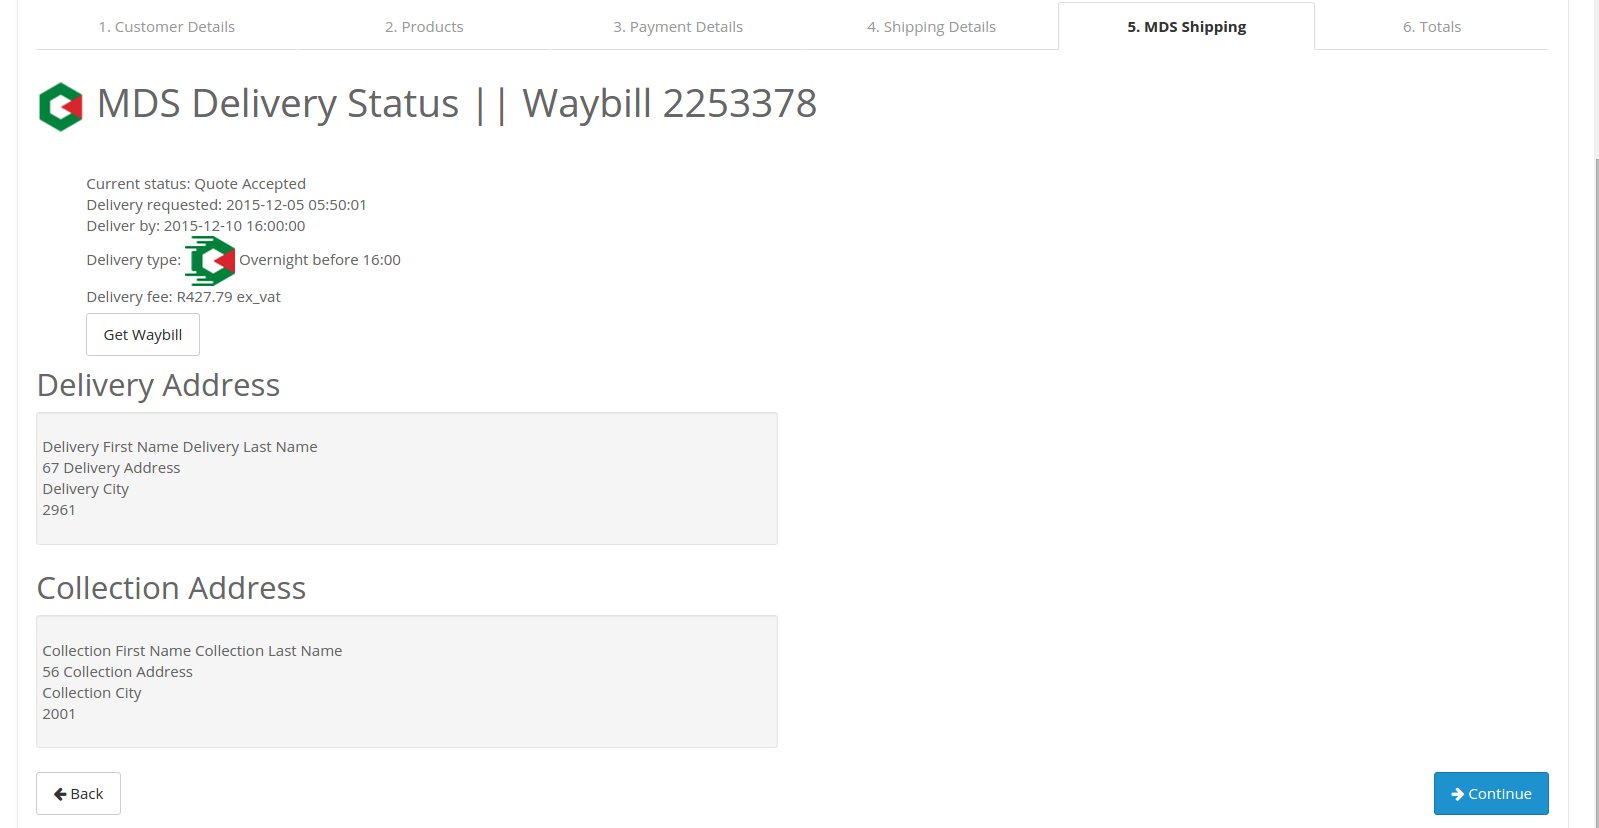
Once you have despatched the collivery you will be able to see the collivery's status.
This will also allow you to view the waybill and when there is a POD, to download the waybill.
Uninstall Instructions
Follow these steps in the order they are listed:
- Head over to the shipping extensions, and deactivate the shipping method MDS.
- On the same page select uninstall (red button) for shipping method MDS
- Go to the modifications page, and uninstall
MDS Shipping Extension OP v2.1-2.2(red button) - On the same page select
MDS Shipping Extension OP v2.1-2.2, then click on the "delete" button (red trash can) - Refresh the oc mod cache
-
Then connect to the filesystem and remove the files that you uploaded.
Specifically:catalog/model/shipping/mds.phpadmin/controller/shipping/mds.phpadmin/language/english/shipping/mds.phpsystem/helper/mds/mds_order.phpsystem/helper/mds/mds_address.phpsystem/helper/mds/Cache.phpsystem/helper/mds/Collivery.phpsystem/helper/mds/MdsService.php
Trouble Shooting Guide
It is sometimes useful to uninstall and reinstall the plugin when facing issues.
- Error:
Undefined property: Proxy::addMdsTransactionTable - This usually occurs when the installation instructions were followed in the incorrect order, follow our uninstall guide and then follow the install guide again
- MDS admin order tab or checkout delivery options not displaying.
- Ensure that the files were uploaded to the correct folders, that the extension is enabled and mds.ocmod.xml was uploaded and cache refreshed.
- Custom address fields not displaying.
- Check if they are added in the admin custom field section. If they are not follow the uninstall and then install instructions.
- Custom address field values are not being populated.
-
Upload mds.ocmod.xml_error_string and refresh the oc_mod cache.
Ensure that your soap serivice is working and that you have the correct MDS login details in the admin MDS extension configuration section. - Error: Undefined index or id.
- Ensure the collection and delivery addresses have the necessary address fields saved as specified in the front-end usage section.
- Error: Invalid information
- Ensure the collection and delivery addresses have the necessary address fields saved as specified in the front-end usage section as well as the validity of the values saved.
- Error: Authentication or Login
- Please check your MDS login details
- Error: Unable to connect or SOAP
- Ensure your SOAP service is working and that your MDS login details are correct.
- Error: Permissions
- Contact your hosting provider to ensure the proper file access permissions are applied to the related files/directories in the error.